There are multiple ways to do pathfinding. One commonly used method is having a navigation mesh or a graph of nodes and then running Dijkstra's algorithm or an A* search on that. In fact, A* is what I used for my adventure games until It's Flot. Instead of a coarse mesh, the graph had a node for every pixel. With low resolution games, there can be just a few thousand nodes to check which can be done even on moderately powerful hardware in a fraction of a second. Unfortunately, for It's Flot, being in full HD, there could be a million or more walkable pixels, leading to a huge slowdown. In certain cases, it could take several seconds to compute a path. So to make the game playable, without having to replace the assets, I replaced the pathing algorithm with one I devised myself. I'm sure I didn't invent something new, but as somebody asked, here's a short description of how it works.
Walkability bitmap
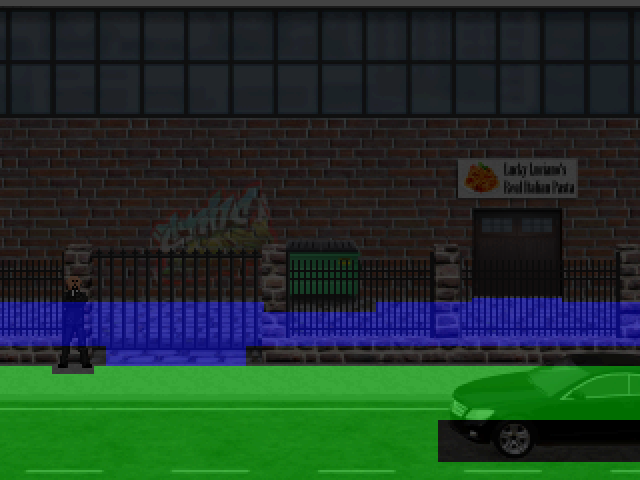
For all my backgrounds where the character can walk around the scene, I have a bitmap that marks every pixel a character can go. There can be multiple areas. For instance, in the image below which shows the walkability bitmap overlaid on the actual game display, the player can always walk to any of the green pixels, but can only move onto the blue pixels once they've convinced the security guard to open the gate for them. The black pixels can never be reached by the player character.
Set-up
The game state determines which (combination) of those areas is accessible. When the player clicks on a pixel to walk there, the first step is to create a buffer the exact size of the scene and to fill it with two possible values: MAX_INT for every pixel the player can walk on, -1 for every pixel they can't walk on. This distance buffer will hold the shortest distance to the target point. This does mean that the elements in the buffer need to be large enough to hold the maximum possible distance (since memory is cheap these days, I just go with a 32-bit signed integer). After initialising that distance buffer, the last thing to set up before getting to the meat of the algorithm is setting up two empty stacks and pushing the target pixel onto one. In pseudo-code:
/* Quick sanity check */
if (!allowed_at (destination.x, destination.y))
{
	/* Destination is unreachable by definition */
	return;
}

/* Initialise the distance buffer */
int distance_buffer [width, height];
for (y = 0; y < height; ++y)
{
	for (x = 0; x < width; ++x)
	{
		if (allowed_at (x, y))
		{
			distance_buffer [x, y] = MAX_INT;
		} else {
			distance_buffer [x, y] = -1;
		}
	}
}

/* Prepare stacks of points to process */
STACK<point> current;
STACK<point> next;
current.push (destination);
Distance calculations
When the set-up is done, it's time to actually calculate the distance to each pixel neighbouring the ones on the current stack, then put all those pixels onto the next stack for the next iteration of the distance finding algorithm. Note that the calculated distance is not the true (Pythagorean) distance but the Manhattan distance. This requires only additions to fill the distance buffer. The way to visualise this is as a diamond-shaped flood fill from that target pixel. In pseudo-code:
/* The destination point obviously has a distance of 0 */
int dist = 0;
distance_buffer [destination.x, destination.y] = 0;
while (true)
{
	/* Next iteration, increase by 1 to get Manhattan distance */
	dist++;

	/* Process all pixels on the current stack
	while (point p = current.pop ())
	{
		/* Check to the left */
		if (p.x > 0 && distance_buffer [p.x - 1, p.y] == INT_MAX)
		{
			distance_buffer [p.x - 1, p.y] = dist;
			next.push ({ p.x - 1, p.y });
		}
		/* Check to the right */
		if (p.x < width - 1 && distance_buffer [p.x + 1, p.y] == INT_MAX)
		{
			distance_buffer [p.x + 1, p.y] = dist;
			next.push ({ p.x + 1, p.y });
		}
		/* Check up */
		if (p.y > 0 && distance_buffer [p.x, p.y - 1] == INT_MAX)
		{
			distance_buffer [p.x, p.y - 1] = dist;
			next.push ({ p.x, p.y - 1 });
		}
		/* Check down */
		if (p.y < height - 1 && distance_buffer [p.x, p.y + 1] == INT_MAX)
		{
			distance_buffer [p.x, p.y + 1] = dist;
			next.push ({ p.x, p.y + 1 });
		}
	}

	/* Nothing added to the next stack? Then we're done */
	if (next.empty ()) break;

	/* The next stack now becomes the current stack */
	current = next;
	next.clear ();
}
Note: although the "up" and "down" in the comments assume the origin is at the upper left (whereas some systems place the origin at the lower left), the code is completely agnostic to this. It is only in the comments for clarification of the process, in a way that matches my own use-case.
Path tracing
After this step, the distance buffer will have a minimum distance for every pixel that is reachable from the target point. If the starting point does not have a proper value, but is still at the initial value of MAX_INT, there is no possible path from the starting point to the destination. We can then trace a path from the start to the end by making sure we always go to the neighbouring pixel with the lowest value in the distance buffer.
dist = distance_buffer [start.x, start.y];
if (dist == INT_MAX)
{
	/* Destination is entirely unreachable from start */
	return;
}

/* The path list will hold all pixels along the path */
LIST<point> path;
point p = start;
while (true)
{
	path.push (p);

	/* Reached the destination? Then the distance should be 0 */
	if (dist == 0) break;

	/* Next distance to look for is one less than the current one */
	dist--;

	/* Allow diagonal movement also, which will have a distance of yet one less */
	int diag = dist - 1;

	/* Check whether the four cardinal directions are allowed */
	bool can_go_left = (p.x > 0) && distance_buffer [p.x - 1, p.y] == dist;
	bool can_go_right = (p.x < width - 1) && distance_buffer [p.x + 1, p.y] == dist;
	bool can_go_up = (p.y > 0) && distance_buffer [p.x, p.y - 1] == dist;
	bool can_go_down = (p.y < height - 1) && distance_buffer [p.x, p.y + 1] == dist;

	/* And go diagonal if possible */
	if (can_go_left)
	{
		p.x--;
		if (can_go_up && distance_buffer [p.x, p.y - 1] == diag)
		{
			dist = diag;
			p.y--;
		} else if (can_go_down && distance_buffer [p.x, p.y + 1] == diag)
		{
			dist = diag;
			p.y++;
		}
		continue;
	}
	if (can_go_right)
	{
		p.x++;
		if (can_go_up && distance_buffer [p.x, p.y - 1] == diag)
		{
			dist = diag;
			p.y--;
		} else if (can_go_down && distance_buffer [p.x, p.y + 1] == diag)
		{
			dist = diag;
			p.y++;
		}
		continue;
	}

	/* Only directions remaining to check are straight up and down */
	if (can_go_up)
	{
		p.y--;
		continue;
	}
	if (can_go_down)
	{
		p.y++;
		continue;
	}

	/* Never should get here */
}
Extra: Simplification
After this, the path list should contain a list of pixels for the character to walk over in the shortest path from the start point to the destination point. We could consider the job done. I prefer to add several steps, though. The first is a simplication step, in which all the intermediate points on a straight line segment (either horizontal, vertical or diagonal) are removed. The path itself will be unchanged after this simplication, but will hold far fewer points.
/* Must be at least 3 points for simplication */
if (path.size () >= 3)
{
	/* Compare the current point and the two subsequent ones */
	LIST<point>::iterator it1 = path.begin ();
	while (true)
	{
		LIST<point>::iterator it2 = it1.next ();
		if (it2 == path.end ()) break;

		/* Calculate direction */
		point p1 = it1.get ();
		point p2 = it2.get ();
		int dx = p2.x - p1.x;
		int dy = p2.y - p1.y;

		while (true)
		{
			LIST<point>::iterator it3 = it2.next ();
			if (it3 == path.end ()) break;

			p2 = it2.get ();
			point p3 = it3.get ();

			/* If there is a change in direction, skip to the next segment */
			if (p3.x - p2.x != dx) break;
			if (p3.y - p2.y != dy) break;

			/* Remove the middle point */
			path.remove (it2);

			/* The old end point becomes the new middle point */
			it2 = it3;
		}

		/* The end point of the last segment becomes the start of the new segment */
		it1 = it2;
	}
}
Extra: Beautification
As the algorithm only checks along the four cardinal directions and the four diagonals, the path may look quite unnatural with the character walking only along those 8 directions, and making turns at odd points. Real people don't walk like that, making 45 or 90 degree turns after a few steps. So, there can be an additional step of "beautifying" the path. We can do this by checking each point along the path to see whether a beeline to there is possible from the earliest possible point. And, if so, eliminating any of the points in between. If it were a tile-based map we were checking where movement goes from the centre of one tile to the next, this step probably shouldn't be used at all, but if the character can walk along an arbitrary line, it greatly improves the path. For more natural paths, I also check smaller fractions of the line segments from the simplication step. If the simplification step hadn't been done, the beautification step would be very simple, but also would be more computationally expensive. Again, in pseudocode:
/* Must be at least 3 points for beautification */
if (path.size () >= 3)
{
	LIST<point>::iterator it1;
	it1 = path.begin ();
	while (true)
	{
		LIST<point>::iterator it2 = it1.next ();
		if (it2 == path.end ()) break;
		LIST<point>::iterator it3 = it2.next ();
		if (it3 == path.end ()) break;

		/* Check whether a beeline between point 1 and 3 is possible. If so, point 2 can be dropped */
		if (beeline_possible (it1.get (), it3.get ())
		{
			path.remove (it2);
			continue;
		}

		/* NOTE: The following part is necessary only if the simplification step has been done, splitting up line segments into smaller parts */
		point p1 = it1.get ();
		point p2 = it2.get ();
		point p3 = it3.get ();

		/* Get the distance between the 2nd and 3rd points */
		int dx = p3.x - p2.x;
		int dy = p3.y - p2.y;
		float dist = sqrt (dx * dx + dy * dy);

		/* Don't bother with less than 10 pixels */
		if (dist < 10) continue;

		/* Check beelines along at most 10 steps, of at least 5 pixels each */
		float step_size = dist / 10.0;
		int num_steps = 10;
		if (step_size < 5)
		{
			num_steps = dist / 5.0;
			if (num_steps < 1) num_steps = 1;
			step_size = dist / num_steps;
		}

		/* Work backwards, the furthest one found should be it */
		for (int i = num_steps - 1; i > 0; --i)
		{
			point p4;
			p4.x = p2.x + (dx * i / num_steps);
			p4.y = p2.y + (dy * i / num_steps);
			if (beeline_possible (p1, p4))
			{
				/* Move the middle point (where the line segments connect and change direction) to be this location */
				it2.set (p4);
			}
		}
		/* NOTE: If you skipped the simplication step, continue from here */

		/* Move on to next point */
		it1 = it2;
	}
}
Implementation of the beeline function is left as an exercise for the reader. What it does is run a Bresenham line algorithm and check the values in the distance buffer for all the pixels along that line against the value -1 (where the is_allowed function returned false during set-up). It returns true if there are no non-allowed pixels and thus a beeline is possible. And conversely, it returns false if even a single pixel along the line is not accessible.
After that beautification step, the path will already look far more natural. In my engine, I run the same algorithm again, but working the other way around (from destination point to starting point) to clean it up even further. I won't bother with showing that code, as it is literally the same as the first beautification phase, but with the path in reverse.
Conclusion
There you have it, all the details of how I do pathfinding on a 2D pixel grid for my adventure games. Although the pseudo-code is relatively unoptimised (for instance: you could stop filling the distance buffer when assigning a distance to the starting point, which will be a bit quicker especially for shorter paths), the final implementation ended up being much faster than my initial A* search and calculates a path even on a grid with a million walkable pixels at a rate fast enough for uninterrupted gameplay. At low resolutions, even 25 year old hardware doesn't break a sweat.
The algorithm runs in almost constant time (for finding a path between any two pixels on the same walkability bitmap). The runtime is effectively linear with respect to the amount of pixels that are reachable from the destination pixel. Even the most pathological case, say a single-pixel-width spiral covering the entire screen should take virtually the same time as a straight line. (Although in my implementation, I do check the trivial straight line (beeline) case before going into the "proper" pathfinding).
And finally, I'm happy to report that implementation of this algorithm led to a speed improvement of 3 orders of magnitude (from over 20 seconds to 10 milliseconds) in pathfinding for the person who inquired. Check out their implementation on GitLab.
Comments
No comments, yet...
Post a comment